


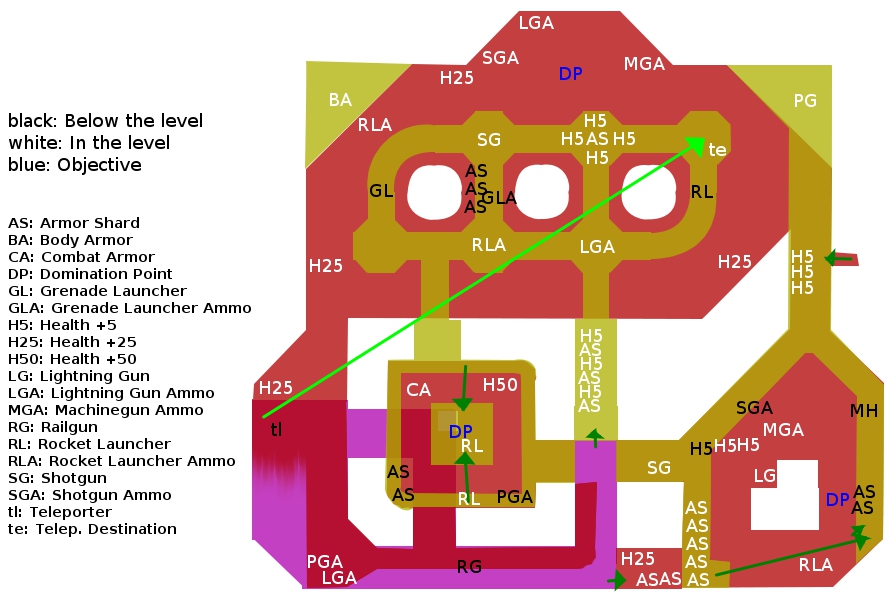
Map description[]
The map is divided into three areas: the Pillars area, located at the north; a southwest area, composed of two subareas, the Generator Room, and the Sewers surrounding it; and the southeast area, the Depot Area.
The Pillars area is the biggest area in the entire map. It's composed of a series of pillars which act, alongside the barrels scattered throughout the level, as cover. It has two balconies at the northeast and northwest, holding the Plasma Gun and Body Armor, respectively. These pillars also act as the "sustainers" for a double walkway. Ladders at the north and south of these walkways make it possible to go from the bottom floor to the top in short time. It has connections with every area in the map. In Elimination matches, the blue team spawns in the entrance, at the very north.
The Generator Room is situated at the southwest of the map. It's connected with the Pillars area via the double walkway. It features the namesake Generator, enclosed into a cage. This cage can be entered and has a drop passage to the Sewers. Outside of the cage, there're two jumppads ending in the top of this cage. In non-DOM matches, the top of the cage contains the Rocket Launcher. In DOM matches, the Rocket Launcher is moved to the South walkway in the room, and a DOM point takes it's place.
The Sewers surround the Generator Room everywhere except North. This area starts at the very southwest corner, with stairs which contain a teleporter below it, and a walkway which extends around the Gen Room. This teleporter ends in the double walkway in the Pillars area, just in front of the PG. Aside of it, there're two entrances under the Gen Room, with a jumppad uniting them. This area is the only area which features water. A large passage below the walkways and among some barrels feature the Railgun. The end of this area features two jumppads, the northest one ending in a passage whose exit is the Pillars area, and the other ending directly in the Depot Area. Half of the Red team starts here in Elimination matches.
Finally, the Depot Room, the second biggest area in the game, features a big L-shaped pillar, tons of boxes (some of them acting as cover) and like some other areas, a walkway connecting several areas of the map. It features the Lightning Gun at the corner of the L-pillar, the Megahealth at the top of some of the boxes, and exits to every area in the map, including the Sewers, the Gen Room and the Pillars. The other half of the Red team starts here.
Domination points[]
Weapons & Items[]
Item location.
Weapons[]
| Weapon | Count | Location |
|---|---|---|
A: 2
|
||
W: 2
A: 2 |
||
 Grenade Launcher |
W: 1
A: 1 |
|
 Rocket Launcher |
W: 3
A: 3 |
|
 Lightning Gun |
W: 1
A: 3 |
|
W: 1
|
||
 Plasma Gun |
W: 1
A: 2 |


Items[]
| Item | Amount | Where? |
|---|---|---|
| +5 Health | 13 | |
| +25 Health | 5 | |
| +50 Health | 1 | |
| Megahealth | 1 | |
| Armor Shard | 18 | |
| Combat Armor | 1 | |
| Body Armor | 1 |
| Health | Armor | Powerup | Holdable | Rune |
|---|
Tactics and strategy[]
Single-player Walkthrough[]
| << Previous (Maps/am_lavaarena) | 0.8.8 SP | (Maps/oa_dm3) Next >> |
|---|
Trivia[]
- The map is a recreation from scratch of the original am_underworks, with a less "platform" feel and a better item placement. The author wasn't too satisfied with the original map. Yet nothing stopped it from being included in 0.8.5.
- The first versions of underworks2 included three houses instead of the pillars, one of which can be entered. These houses were removed in one of the final versions.
- Like many of Neon_Knight's maps, the am_ at the beginning of the filename belongs to his old nickname, "Armageddon_Man".
Gallery[]
.jpg "Am underworks2 (1).jpg (369 KB)")
.jpg "Am underworks2 (2).jpg (467 KB)")
.jpg "Am underworks2 (3).jpg (427 KB)")
.jpg "Am underworks2 (4).jpg (514 KB)")
.jpg "Am underworks2 (5).jpg (436 KB)")
External links and references[]
| FFA-based maps |
|---|
| aggressor • am_galmevish2 • am_lavaarena • am_spacecont • am_underworks2 • blitzkrieg3 • ce1m7 • czest1dm • czest1tourney • dm6ish • kaos2 • mlca1 • oa_dm1 • oa_dm2 • oa_dm3 • oa_dm4 • oa_dm5 • oa_dm7 • oa_koth1 • oa_koth2 • oa_minia • oa_pvomit • oa_rpg3dm2 • oa_shine • oa_shouse • pul1duel-oa • pxlfan • sleekgrinder • slimefac • suspended • wrackdm17 |